Kohlrabi, often called the “German turnip,” is a unique and versatile vegetable known for its crisp texture, mild flavor, and impressive nutritional value. Rich in vitamin C, potassium, fiber, and antioxidants, this root vegetable can be enjoyed raw, roasted, sautéed, or added to soups and stews.
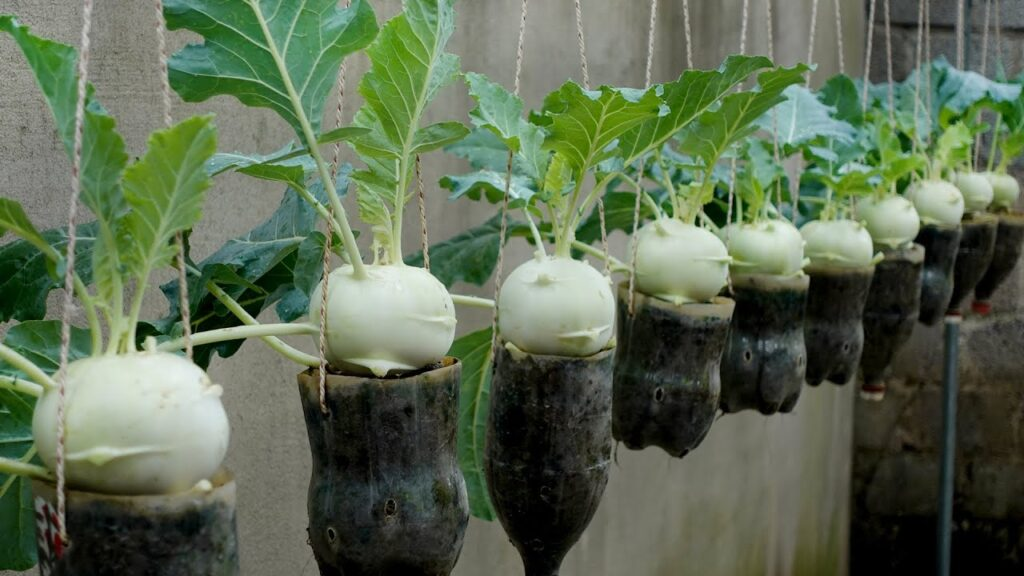
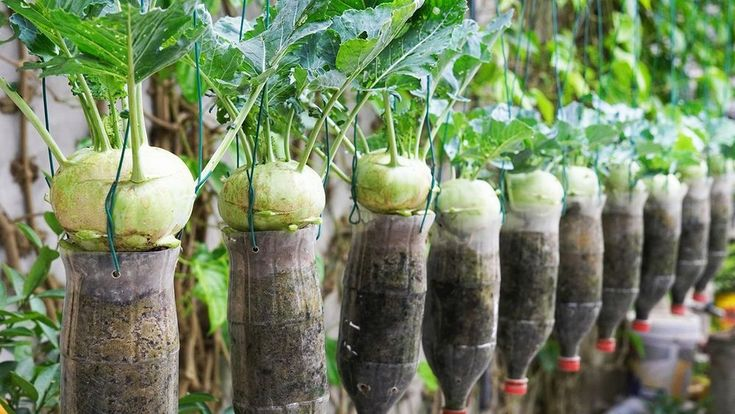
What makes kohlrabi even more exciting is its adaptability—it can thrive even in a plastic bottle garden! This space-saving and eco-friendly method is perfect for urban gardeners, small-space growers, or anyone looking to combine sustainability with home gardening.
Why Grow Kohlrabi in a Plastic Bottle?
Growing kohlrabi in plastic bottles offers several benefits beyond convenience:
- Space-Efficient: Ideal for balconies, windowsills, or patios.
- Eco-Friendly: Reuses plastic bottles, helping reduce household waste.
- Controlled Growth: Allows better control of soil and water conditions.
- Pest Management: Elevated containers deter soil-borne pests.
- Fun and Educational: Perfect for beginners, children, and eco-conscious gardeners.
Materials You’ll Need
- Plastic bottles (1–2 liters recommended)
- Utility knife or scissors
- Potting soil or compost-enriched garden soil
- Kohlrabi seeds or seedlings
- Cotton string or cloth (optional for self-watering system)
- Small pebbles (optional for drainage)
- Water
- Organic or balanced liquid fertilizer
Step 1: Preparing the Plastic Bottle
- Wash the bottle thoroughly.
- Cut it horizontally about one-third from the top.
- Make small drainage holes in the bottom of the top section.
- (Optional) Thread a cotton wick through the bottle neck for a self-watering setup.
Step 2: Adding Soil and Drainage

- Add a layer of small pebbles for drainage (optional).
- Fill the top section with nutrient-rich soil or compost mix.
- Maintain a pH level between 6.0 and 7.5 for best results.
- Leave an inch of space at the top for watering.
- If using a wick, ensure it touches the water in the bottom section.
Step 3: Planting Kohlrabi Seeds or Seedlings
- From Seeds: Sprinkle 2–3 seeds and lightly cover with soil.
- From Seedlings: Plant one per bottle, covering the roots fully.
- Water gently to settle the soil and encourage growth.
Step 4: Setting Up a Self-Watering System (Optional)
- Fill the bottom part of the bottle with water.
- Make sure the wick or soil touches the water.
- Refill as needed to maintain consistent moisture.
Step 5: Caring for Your Kohlrabi
Sunlight
Place bottles where they receive 4–6 hours of sunlight daily. Kohlrabi prefers full sun but tolerates partial shade.
Watering
Keep soil consistently moist. Irregular watering can result in tough or woody bulbs.
Fertilizing
Apply a balanced liquid fertilizer every 2–3 weeks.
Pruning
Remove yellow or damaged leaves to promote airflow and reduce disease.
Pest Management
Monitor for aphids, flea beetles, and cabbage worms. Use neem oil or mild soap sprays for organic pest control.
Tips for Maximizing Growth
- Thin seedlings to leave one strong plant per bottle.
- Use taller bottles for deeper root growth.
- Maintain cooler temperatures (60–75°F).
- Rotate bottles for even sunlight exposure.
- Harvest regularly for continuous yield.
Harvesting Kohlrabi
- Ready for harvest 50–70 days after planting.
- Ideal bulb size: 2–3 inches in diameter.
- Cut at the base, leaving roots intact for potential regrowth.
- Young leaves are also edible and delicious in salads or stir-fries.
Common Challenges and Solutions
| Problem | Cause | Solution |
|---|---|---|
| Forked or deformed bulbs | Overcrowding or compacted soil | Thin seedlings and loosen soil |
| Slow growth | Heat stress or poor soil | Keep soil fertile and cool |
| Pest damage | Aphids or worms | Use organic pest sprays |
| Overwatering | Poor drainage | Check holes and water moderately |
| Bolting (flowering early) | Heat stress | Keep moisture consistent |
Benefits of Growing Kohlrabi in Plastic Bottles

- Fresh, nutritious produce at home
- Eco-friendly and sustainable gardening
- Ideal for urban or indoor spaces
- Low-maintenance with self-watering options
- Year-round growth with succession planting
Year-Round Kohlrabi Gardening Tips
- Indoor Growing: Use grow lights or sunny windows in winter.
- Succession Planting: Sow seeds every few weeks for continuous harvest.
- Companion Planting: Pair with herbs, lettuce, or spinach.
- Variety Testing: Try different kohlrabi types for color and flavor.
Expanding Your Plastic Bottle Garden
Once you’ve mastered kohlrabi, you can grow other crops in the same setup:
- Radishes
- Lettuce
- Spinach
- Green onions
- Small root vegetables like beets and carrots
The secret behind growing kohlrabi in a plastic bottle lies in creativity and understanding the plant’s needs. With proper soil, sunlight, and care, you can enjoy fresh, homegrown kohlrabi even in the smallest spaces.
This eco-friendly method empowers urban gardeners to grow sustainably and reap the rewards of their mini-gardens year-round. Start your plastic bottle kohlrabi project today and experience the joy of sustainable urban gardening!
FAQs
Can I really grow kohlrabi in a plastic bottle?
Yes! Kohlrabi can grow successfully in a 1–2 liter plastic bottle as long as it has good drainage, nutrient-rich soil, and regular watering.
How long does it take for kohlrabi to mature in a bottle?
Kohlrabi bulbs are typically ready to harvest 50–70 days after planting, depending on the temperature and care provided.
Do I need sunlight to grow kohlrabi indoors?
Yes. Kohlrabi needs at least 4–6 hours of sunlight daily. If growing indoors, place it near a sunny window or use LED grow lights.
What size of plastic bottle works best?
A 1–2 liter plastic bottle is ideal. It provides enough space for root development and bulb growth.
Can I reuse the same soil for another batch of kohlrabi?
It’s best to refresh or replace the soil between plantings to restore nutrients and prevent pest buildup.